Key takeaways
- Sleeve fan and RGB cables together where they share a destination header.
- Leave 1cm of slack at each connector so you can reseat parts later.
- Keep the 12V-2×6 GPU cable straight for at least 35mm out of the connector before any bend.
Cable management is the difference between a build that looks like a rat’s nest and one that pulls clean airflow through every fan. Beyond the aesthetics, tidy cabling lowers case temperatures by 2-4°C in most mid-towers because unobstructed intake and exhaust paths let your fans breathe. In 2026, with GPUs pulling 300W+ and the new 12V-2×6 power connectors demanding gentle bend radii, getting your cables right is a genuine performance and safety task, not just a beauty contest.
This guide walks you through routing, tie-down strategy, and the specific tools that make a first-timer’s build look like a system integrator did it. You do not need a modular power supply or a fortune in accessories—just patience, a plan, and a handful of sleeves, clips, and Velcro straps. Set aside about 90 minutes for a full re-cable of an existing rig.
Our top picks
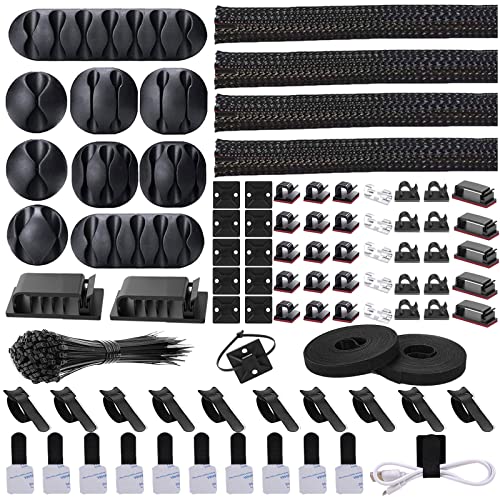
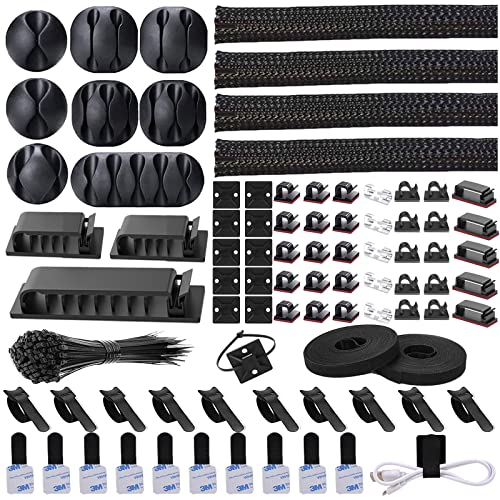 N NOROCME 192 PCS Cable Management Kit
- Cable Management Kit: 4pcs Cable Sleeves( 20 in…
- 6 kinds of Cable Clips:46pcs wire Clips is…
- Premium Material: Made of highly sturdy and quality…
 Cord Management Organizer Kit 4 Cable Sleeve
- Cable Management Organizer Kit: This comprehensive kit includes…
- Safety Material: Made of highly sturdy and quality…
- 3 kinds of Black Cable Clips:36pcs wire Clips…
 311Pcs Cable Management Organizer Kit 4 Cable
- Cable Management Kit:4pcs Cable Sleeves( 20 in L…
- 6 kinds of Cable Clips:65pcs wire Clips is…
- Premium Material:The sleeve is made from PET material,…
| Product | Key specs | |
|---|---|---|
| N NOROCME 192 PCS Cable Management Kit | Cable Management Kit: 4pcs Cable Sleeves( 20 in… 6 kinds of Cable Clips:46pcs wire Clips is… Premium Material: Made of highly sturdy and quality… | Check price |
| Cord Management Organizer Kit 4 Cable Sleeve | Cable Management Organizer Kit: This comprehensive kit includes… Safety Material: Made of highly sturdy and quality… 3 kinds of Black Cable Clips:36pcs wire Clips… | Check price |
| 311Pcs Cable Management Organizer Kit 4 Cable | Cable Management Kit:4pcs Cable Sleeves( 20 in L… 6 kinds of Cable Clips:65pcs wire Clips is… Premium Material:The sleeve is made from PET material,… | Check price |
 Alex Tech 10ft Alex Tech 10ft | Size: Diameter: 1/2"| Length: 10 Feet | Color:… Operating temp (degree F.):-103 to 257|Melt temp: 446 Our cord protector keeps cat from chewing cables | Check price |
 Sirlyr Black 24-PCS PSU Cable Combs Kit Sirlyr Black 24-PCS PSU Cable Combs Kit | 【Premium Cable Management Kit】✔️ Includes 24 PCS of… 【Durable & Flexible PP Material】✔️ Made of reinforced… 【Clean PC Builds, Better Airflow】✔️ Eliminates tangled cables,… | Check price |
 494 PCS Cable Management Kit 494 PCS Cable Management Kit | 【Cable Management Kit】 4 cable sleeve split (15.7… 【Make Your Life Easier and Tidy】 To break… 【High-Quality Materials】 Our cable management kit is made… | Check price |
 80PCS Hook and Loop Cable Ties 80PCS Hook and Loop Cable Ties | Flexible Cord Management: With more and more appliances… Strong Back-Glue: Hook and loop cable clips is… Easy Adjustment: The hook and loop cable clips… | Check price |
 Cable Management Under Desk Cable Management Under Desk | 【NO DRILL & INSTANT CLAMP INSTALLATION】 Say goodbye… 【LARGE CAPACITY CABLE MANAGEMENT TRAY】 The 25.3-inch wire… 【PREMIUM METAL WIRE ORGANIZER】 Constructed from high-quality metal,… | Check price |
As an Amazon Associate we earn from qualifying purchases at no extra cost to you.
⚡ Save on Your Next PC — Amazon Prime
Prime members get fast free shipping on the systems above, plus early access to Prime Day & Black Friday PC deals. New members get a 30-day free trial.
Watch: How to Cable Manage Your Gaming PC — Video Review
Plan Your Routes Before You Plug Anything In
The single biggest mistake is plugging cables in first and organizing later. Instead, dry-fit every cable through the case before connecting the ends. Modern cases have a dedicated cable channel behind the motherboard tray, usually 20-25mm deep, with pre-drilled tie-down loops. Map the shortest sensible path for each: the 24-pin ATX from the PSU shroud up the right edge, the 8-pin EPS CPU power up the far-right channel to the top of the board, and PCIe GPU power through the grommet nearest the top slot.
A kit like the N NOROCME 192-piece cable management set gives you sleeves, adhesive clips, and cord holders in one box, which covers routing for a typical single-GPU build with room to spare. Lay out your clip positions before peeling any adhesive backing.
Sleeve the Ugly Runs
PDU-style split sleeving hides the front-panel wires, fan cables, and RGB leads that no amount of tucking will tame. Split sleeves like the Alex Tech cord protector wrap around existing cables without unplugging anything, so you can bundle three or four thin cables into one clean trunk. For the visible front section—the run from your PSU combs to the motherboard—a comb kit such as the Sirlyr 24-piece PSU cable comb set keeps individual wires parallel and flat instead of splayed.
- Sleeve fan and RGB cables together where they share a destination header.
- Leave 1cm of slack at each connector so you can reseat parts later.
- Keep the 12V-2×6 GPU cable straight for at least 35mm out of the connector before any bend.
Anchor Everything Behind the Tray
Velcro straps beat zip ties for anyone who upgrades. They release cleanly, never crush a cable, and can be re-cinched a hundred times. Anchor each bundle to a tie-down loop every 8-10cm so nothing sags into the rear side panel—bulging cables are the number one reason a back panel refuses to close. Adhesive cable clips fill the gaps between factory loops on cheaper cases.
Manage the Front-Panel Spaghetti
Front-panel connectors (power switch, reset, HD audio, USB) are the fiddliest cables in any build because they are thin, long, and terminate in tiny separate plugs. Route them as a single sleeved bundle from the case’s front I/O down through the nearest grommet, then across the back to the bottom-right corner of the board. Consult your motherboard manual for the exact F_PANEL pinout—getting the power switch polarity wrong just means flipping the connector, but audio and USB plugs are keyed and only fit one way.
Tips
- Take a photo of your connections before closing the case—it saves you reopening later.
- Route the GPU power cable last, after the card is seated, to judge the true slack you need.
- Use 5mm adhesive clips for single thin cables and 10mm for bundles.
- Never cinch a strap so tight it dents the cable jacket—that stresses the copper inside.
Frequently Asked Questions
Do I need a modular power supply for good cable management?
No. A non-modular PSU just means you tuck the unused cables into the PSU shroud or a spare drive bay. Modular units are cleaner because you only install the cables you use, but a well-sleeved non-modular build looks nearly identical from the front.
Will cable management actually improve my temperatures?
Yes, modestly. Clearing cables out of the front intake and away from the CPU cooler typically drops case ambient temps 2-4°C, which translates to slightly lower fan speeds and less noise. It will not turn a hot GPU cool, but every degree helps sustained boost clocks.
Are zip ties bad for cables?
Over-tightened zip ties can pinch and eventually damage a cable jacket, and they must be cut to adjust. Velcro straps are the better long-term choice for a system you plan to upgrade. If you do use zip ties, leave them finger-loose and trim the tails flush.
How much slack should I leave at each connector?
About 1cm (roughly a finger’s width) at every plug. That gives you enough room to reseat RAM, swap a GPU, or unplug a fan without fighting a taut cable, while still keeping the run tidy.
Conclusion
Good cable management is a plan plus about an hour of patient work. Route before you connect, sleeve the ugly runs, anchor bundles with Velcro every 8-10cm, and respect the bend radius on your GPU power. Do that and you get a cooler, quieter, upgrade-friendly PC that looks like a pro assembled it—no exotic tools required.